Saturday, May 31, 2014

Tulip Fest


Hey there and welcome to another Saturday.  I have a scrapbook layout today. I’m a card maker but recently I have started a bucket list scrapbook.  The first entry was about seeing the Oscar Meier Wiener Mobile.  Recently I got to scratch another event off my list.  Each year here in Oregon, there is a giantic tulip festival in Woodburn.  I have looked at pictures/news reports for years but have always wanted to attend.  The girls and I had planned to attend the home show here locally and then head to their new home to identify plants in the landscape, then have lunch.  Daughter #3 was available also (added bonus)  So the girls wanted to know if I was up for an adventure?  Sure why not!!  Off we went.  

I have created a 2 page layout using the Gardening Tweets file created by ScrappyDew.  Here are the lyrics:

Background paper K&Co “smitten”
Gardening tweets #2 & #3
Grass-Colorbok Designer Papers “outdoors”
Stems-Colorbok Mirror paper
Tulips DCWV Glitter Stack
Really old Glitter sheets by Petaloo
Recollections solid card stock
Dollar Store Plastic photo album
Some jewels, sparkles and paper scraps/vellum
Favorite things Felt buttons

Here are the layouts.  I hope you read the mom-napped story.  An added bonus you get to see me!  


 I found a way to put an actual photo album on a scrapbook page.  I just cut out around the album when I put the page protector on.  Pretty cool huh!


If you have questions about anything I did just shoot me a email or click the coffee cup on the right side of the blog to go to my facebook page.


Now we are expecting 10-14 days of really nice weather.  So I might be taking next week off.  I am re-designing and re-working the landscaping around the house and knocking down the back wooden deck.  So I’ll see ya when I see ya!


Bright blessings everyone!!!  Love Jana


Friday, May 30, 2014

Mother's Day


Here is a card I made for Mother’s Day using the Scrap Factory Doll Builder program. It’s so much fun to create dolls with this software! I cut the images with my Cricut Explore and used my Cuttlebug to emboss the scallop circle. The scallop circle is from the Elegant Edges cart.


~Paulette~

Page Peepers


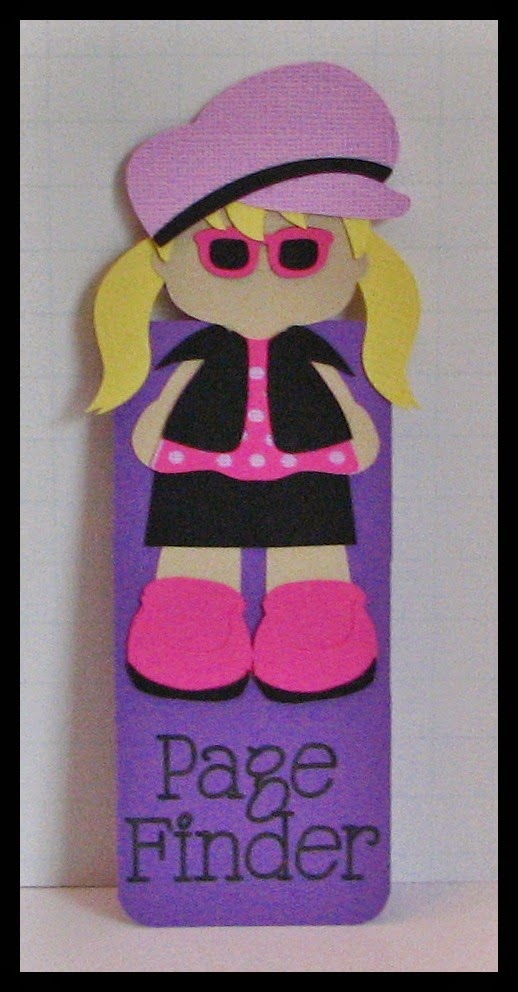
OK, they are really bookmarks! But bookmarks sounded a little boring and these are anything but boring!
 Reading, in general, is so important! But studies have shown that children read less in the summertime. It makes sense because there are so many other fun activities. To encourage your child to read, why not make a fun bookmark or Page Peeper? I made these Page Peepers using the Scrap Factory Doll Builder Program and my Cricut Explore. I started by choosing a rounded rectangle and then sized my doll body and welded the two. I cut the base out of thick Bazzill cardstock. I used Cricut Design Space to create the base and to add the sayings. Once everything was set up in Design Space, the Explore cut all the pieces and wrote the sayings on the base. I then assembled all the paper dolls. Here’s close ups:
 This hip girl paper doll was created with the basic body, the Angie hairstyle, the Diva Dress 3 and the sunglasses accessory.
 This dressed for success boy paper doll was created with the basic body, the Guy hairstyle and the Vest & Pants outfit.
 This little sweetie girl paper doll was created using the basic body, the Dania hairstyle and the Sunday Dress outfit.
 This cool dude paper doll was created with the basic body, the Neil hairstyle and the Vest (Open) & Pants outfit and the Boy Sunglasses accessory.
And our little cheerleader paper doll was created with the basic body, the Riley hairstyle and the Cheerleader outfit.


Wouldn’t it be neat to create a Page Peeper paper doll that resembled your child and have their name written on it? It might just be the encouragement they need to read this summer!

~Paulette~

Thursday, May 29, 2014

Money Envelope


Hello friends!!!!


This weekend I´m celebrating my husband 50th birthday, so we will be away for a couple of days.


Even though, here is my Friday ScrappyDew´s post.


This week, I made a gift for Sarita, born to be daughter of my cousin Adriana.


They are having a “piggy bank” baby shower, we give her money instead of a gift, so she can be able to buy the baby the things she really need.


So I made this money envelope for her


This lovely pigglet is from the Pooh Dress Up and Friends ScrappyDew´s cutting file.


I just found it adorable and perfect for this money envelope.


~Monica~


Tuesday, May 27, 2014

Graduation Frame


Hey Everyone! Ken here with another Kreation. This project is near and dear to my heart. This is for my niece who is graduating from East Valley High School in the next few weeks. She sent two pictures with her graduation announcement and I though what a great excuse to make a frame! For this project I used both my Silhouette Cameo, Cricut Explore and the amazing Scrap Factory Doll Builder.


For this Frame I used the amazing Scrap Factory Doll Builder for the Graduation Doll and the Class of 2014 title. I received both of the pictures from my niece in her graduation announcement. I took these photos and matted them using designs from the Cricut Cartridge, Small Talk Frames & Tags.


They recently just release the Graduation Expansion Pack for the  Scrap Factory Doll Builder. In the Graduation Expansion Pack you will get One Boy and One Girl Graduation Outfit, a Diploma,GraduationTitle, & Two Hairstyles (one boy & one girl). This expansion pack will work with all outfits/hair styles from ScrapFactory Base Set, Diva Set, & Seasons Set. I imported my doll into Cricut Explore Design Space and using their grid system cut her at 5 inches. 


The Graduation Title comes with the Graduation Expansion Pack. I imported the sentiment into Cricut Explore Design Space and using their grid system cut her at 3 inches. I used Crystal Stickles on the “Class of 2014” to give it some sparkle and to draw your attention to it. I took embroidery string in green and white and glued them under a silver brad to make the tassel.


I wanted to incorporate her school mascot and name into frame. I went onto Google images and looked for her school and found their crest. I imported this using my Designer Edition Software and cut it with my Silhouette Cameo. I decided to use the Trace and Detach option on their logo. Then using my favorite feature of the Silhouette Cameo  and proceed to Print and Cut the image.


SUPPLIES:
MACHINES: CRICUT EXPLORE, SILHOUETTE CAMEO
FRAME: SHADOW BOX FRAME
PAPER: CRICUT SOUTHWEST, CRICUT CANDYSHOP, CRICUT ANTIQUITY
ADHESIVE: ATG GUN, 3D FOAM DOTS, XYRON TAPE 
INK: DEWDROP INKERS

You will also need the Scrap Factory Doll Builder to make this project:
Thanks for taking a look at today’s kreation!

Ken

Kindergarten Graduation


It’s that time of year now! School is ending and there are lots of graduation photos that need scrapping. Here is a layout I made for my son’s kindergarten graduation using the Scrap Factory Bears Expansion Pack and Graduation Expansion Pack


Visit my Facebook page for videos on this layout www.facebook.com/LissaLeigheDesigns TFL! DT~Melissa


Saturday, May 24, 2014

The Futures So Bright!


It’s that time of year for graduations.  I have two really cute cards that I have made using the fabulous files found over at ScrappyDew.  This first file that I used is called Graduation Palz.  I used this file for the guy cards. (made 3 of those). And the next file I used is from the Scrap Factory expansion pack called Graduation (for the girl card).  Scrap Factory is a paper doll program but it has so many options. You can literally make 1000’s of different combinations and it now has animals to dress up also.  Here is the link to Scrap Factory and all the details.

Now these cards are a standard A2 size.  So using my scraps was a given. The background paper is a pic I printed out that was taken by the Hubble Telescope of a far distant galaxy.  On the grad girl, she had to be kinda special.  My dear friend Jan is graduating from college.  She raised all her children and now is taking the time for herself.  I am very proud of her.  So she had to have special sunglasses and of course flip-flops (all these accessories can be found in the Scrap Factory program)  So here they are….


The cards have the envelope below


Jan’s Card  


So that’s it for this week.  Hope you can pick up the Scrap Factory program.  If you do, I would love to see what you create.  


Now on a more serious note, let’s all remember the real reason for the Memorial Day Holiday.  It’s not BBQ’s and going on vacation. “This one day of the year, we are all asked to stop and reflect on the sacrifices of those who have paid the ultimate price in service to our nation.” This is a quote from a very well written article.  What is Memorial Day?  Take a moment to remember them this weekend.  


Bright Blessings, Jana


Thursday, May 22, 2014

Sweet Dreams Layout


This Friday I´m in baby mood.


I found that GOOD NIGHT ScrappyDew´s cutting file was just perfect to make a baby layout


 (Sorry for the poor pictures, I´m terrible LO photographer)


"Dulces Sueños" means Sweet Dreams


On the journal, I wrote Salm 4:8

I will both lay me down in peace, and sleep: for thou, Lord, only makest me dwell in safety.”


Aren´t those sleepy bears so cute???


Thanks for stopping by.

Saturday, May 17, 2014

A Beach Birthday

Boy how time flies.  It’s Saturday again!!!  Time to reveal the last of the marathon birthday card creations.  My dear friend loves the beach, and is fortunate enough to have a beach house to enjoy.  So it was only fitting that her birthday card be a beach themed one.

I just love being able to use files from ScrappyDew.  This week I have used the file called Honeymooners.  Only I did some creative editing.  I use the wonderful cutting program Make The Cut.  I was able to mirror the girl on the blanket and make her bigger (i left out the male figure, sometimes a husband just gets in the way).  When I pieced together the file I also had to do a little trimming to remove the un-needed areas.  The base of the card in a box is made by Core’dinations and called Gemstones.  Aren’t the embellisments wonderful?  I found these on a trip to the local St. Vinnies thrift store.  25 cents for a package of EK Sucess is pretty darn cheap.  I created the words in MTC also and used the clear pop bottle strips to support them.  Here is the finished card from all angles.

Happy Birthday!

Love the paper for the flaps

How I decorated the outside

Couldn’t believe I found these embellishment for .25 cents

Front flap  Envelope used Graphic 45 ‘On the Boardwalk’


In the coming weeks I have a couple of scrapbook layouts to share and a batch of graduation cards.  I am also thinking it is just about time to start Christmas projects. I have a bazaar that I show my creations the first weekend of December.  I really want to have a fantastic showing this year! (snowed last year

So take care my friend, bright blessings for the coming week!  Jana


Friday, May 16, 2014

Summer Bucket List


A refrigerator magnet project, an “I’m bored bucket” with things for kids to do if they say they’re bored! Inside it’s filled with little notes they can select.  


Summer Boy and Girl outfits from the Scrap Factory Base Set, and the Bucket is from the Seasons Expansion Pack


~Paulette~


Thursday, May 15, 2014

Class of 2014 Mini Album


Hello friends!!!


This I have been playing with the expansion packs from 


I made a “Class of 2014” Mini Album, using the “mix and match” feature of the Scrap Factory software.


This lovely bear is now included with the purchase of the Scrap Factory.


For this project, I used “Fluffy Bear Body”


For the outfit I used the Grad Expansion Pack -that will be released soon-, there I chose the “boy grad suit” and the “diploma” from the accessories available.


~Monica~


Graduation Card and Embossing Folder


Graduation Card & Embossing Folder


I used the Graduation 2013 file to create this embossed border and title for my card.  There is more content in this file than I used.  Very cute to work with.


Graduation is here and we have back to back to back…graduates with in our family and friends so this file was a no brainer to get.  I was happy with myself for making this embossing folder.  One thing I would add is a second layer of the image to the folder to get a deeper embossed look.


inside of card


Embossing Folder/Strip


Folder assembled


I used repurposed chipboard aka “Texas Toast” box and blue painters tape to assemble folder.  I ran it through my Sizzix Big Shot with the platform and no tabs, but I did use the rubber mat.  I used my cricut and set it to cut twice.  It worked perfectly!


Tuesday, May 13, 2014

Angel Frame

Hey Everyone! Ken here with Ken’s Kreation’s. Well I hope all of the mom’s out their had a wonderful Mother’s Day. Mother’s Day has turned into a tough day since I lost both my Mother and Stepmother at a young age. I was 24 when my Mother passed and then 4 years later I lost my step-mother. This year instead of struggling with the day, I turned to my craft room and found a way to honor them instead. Here is my dedication to all of the people we have lost:

I made this frame using the Scrappy Dew File LITTLE ANGELS. This is a great set that features a variety of angels on clouds. This was a perfect set for the theme of the project. I started with a craft board that I found at home depot. This wood craft board measures two feet long and was 1.28, which is much better than what I would have paid at Hobby Lobby. Then using the LITTLE ANGELS in my Silhouette Studio Software i  build the angel from the base up using the SVG files. Once i had the doll constructed as I like, using my Silhouette Cameo’s print and cut feature, I printed the angel at 4.5 inches on the SQUARE 1 PRINTABLE FABRIC. 

I found a curly font that I liked and typed it into my Silhouette Studio Software. When I type I type the font out and then using the corners, I either make my font smaller and larger depending on the project I am using. After i found the size of the font I liked, I used the offset feature at .05 and made the base of the letters. I cut my sentiment on WHITE VINYL and the shadow on DARK BLUE. Here is the link to the “curly fonts” on dafont.com
CURLY FONTS CATEGORY
For the clouds I used one of my favorite Silhouette Materials. I cut out the clouds that come with the LITTLE ANGEL set and cut them on Silhouette’s DOUBLE SIDED ADHESIVE MATERIAL. I love this material since both sides are sticky I was able to cut the clouds, peel away the yellow film and stick it down on my board. Then once I had all the clouds down I peeled off the white film and sprinkled  Silhouette WHITE GLITTER„ Martha Stewart TINSEL GLITTER and Martha Stewart CHUNKY GLITTER all over the clouds until covered. I finished the angel off with some Stickles GOLDEN ROD for her halo. 

This was a super fast and easy project and it helped me honor my Mom’s on Mothers Day even though they are not here with my in this physical form. 
Supplies and Project Details:
Time: 25 Minutes

Machine:  Silhouette Cameo
Software: Silhouette Studio Software
Board Material: Wood Board
Media: SQUARE 1 PRINTABLE FABRIC
                        DOUBLE SIDED ADHESIVE MATERIAL
Vinyl: WHITE VINYL, DARK BLUE
Glitter: WHITE GLITTER, TINSEL GLITTER , CHUNKY GLITTER
Stickles: GOLDEN ROD
*SALE 70% off $30 ORDER - NO COUPON REQUIRED*

~Ken~